
Your shopping cart is empty!
Shopping Cart
0 item(s) - FreeCustomization and Conversion for: Ctrader, MetaTrader(MT4, MT5), Thinkorswim, NinjaTrader, MultiCharts, Tradingview, Prorealtime, SierraChart, etc.
License renew price will be 20% off for the 2nd year and after.
Every Purchase Comes with a Coupon.
Share Your Experience. Help Other Traders Learn. Get Rewarded.
Share Your Experience. Help Other Traders Learn. Get Rewarded.
Featured



Dynamic Supply Demand Zone indicator for NinjaTrader 8
 (
(
The Dynamic Supply & Demand Zone indicator identifies and displays active supply and demand zones directly on the price chart. It helps traders monitor potential reaction areas, zone strength, breakout or breakdown possibility, price distance to zones, and recent broken-zone statistics.
The indicator can also provide visual labels, dashboard information, and alerts for first touches, breakouts, breakdowns, and rejections.
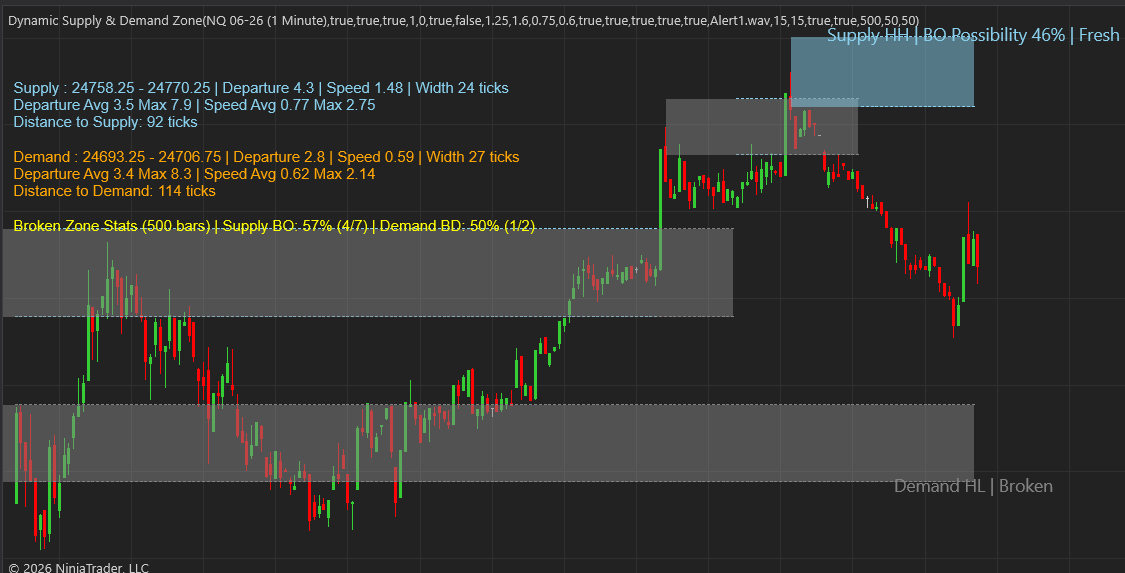
This manual provides a detailed technical breakdown of the configuration inputs for the Dynamic Supply & Demand Zone (DSDZ) indicator. It outlines how each setting modulates chart logic, structural visualization, and algorithmic order-flow analysis from a professional execution perspective.
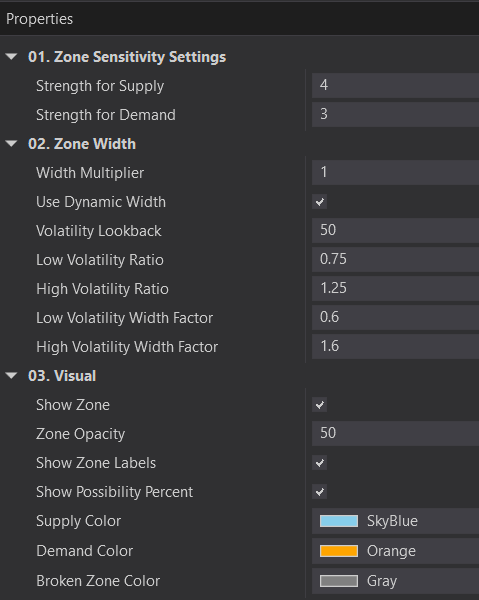
1. Zone Sensitivity Settings (Market Structure Identification)
This section governs the underlying structural logic of the indicator, defining how macro and micro liquidity pools are isolated based on structural pivot variations.
| Parameter Name | Practical Trading Utility & Chart Impact |
| Strength for Supply | Determines the structural significance required to generate a Supply Zone. Higher values isolate macro-level institutional distribution blocks and filter out minor consolidation noise. Lower values capture short-term, micro-liquidity pools ideal for intra-day scalping. |
| Strength for Demand | Determines the structural significance required to generate a Demand Zone. Increasing this setting forces the engine to look for major macro-structural turnarounds, while decreasing it maps out local accumulation zones. |
2. Zone Width & Volatility Adaptation
These settings control the Dynamic Width Mechanism. Instead of generating static boxes, the indicator continuously scales zone thickness to match shifting market regimes, protecting traders from over-extended risk during high-volatility expansions.
Base Scalers
-
Width Multiplier: Sets the baseline vertical depth of the structural zones. Increasing this value expands the zone boundaries symmetrically, accommodating larger stop-loss buffers, while lowering it produces tight, pinpoint execution zones.
-
Use Dynamic ATR Width: The master switch for the indicator’s volatility-adaptive engine. When enabled, zone boundaries automatically expand during explosive market environments and compress during low-activity consolidation periods.
Volatility Regime Classifiers
-
Volatility Lookback: Establishes the historical lookback window used to compute the baseline market volatility. This baseline serves as the yardstick against which current market expansion or contraction is judged.
-
Low Volatility Ratio: Defines the exact boundary where the market is considered to be entering a highly compressed, low-volatility state relative to its historical baseline.
-
High Volatility Ratio: Defines the exact boundary where the market is considered to be entering an aggressive expansion or highly volatile state.
Width Modulation Factors
-
Low Volatility Width Factor: Controls how much the zone compresses when market activity drops below the defined low-volatility threshold. It narrows the zones to prevent over-exposure during tight consolidations.
-
High Volatility Width Factor: Controls how much the zone scales outward when market activity surges past the high-volatility threshold. It widens the zones to account for slippage, wide spreads, and aggressive institutional stop-hunts.
3. Visual Configurations & Analytics
This group manages visual real estate and provides predictive statistics directly on the interface, translating order-flow data into readable structural states.
[Supply LH / HH] ───►  | Breakout Possibility: XX% | Tested 1x / Fresh
═════════════════════════════════════════════════════════════════════
   Active Structural Footprint (Custom Opacity & Color Themes)
═════════════════════════════════════════════════════════════════════
-
Show Zone / Zone Opacity: Toggles zone visibility and transparency. Allows layering over multiple indicators without obstructing primary candlestick price action.
-
Show Zone Labels: Renders text identifiers showing the exact structure type, such as lower-high/higher-high structural sequences for supply, and higher-low/lower-low sequences for demand.
-
Show Possibility Percent: Displays the proprietary Breakout (BO) / Breakdown (BD) Possibility Score next to active zones. This real-time probability matrix evaluates structural strength based on mitigation depth, consecutive tests, and arrival momentum.
-
Color Pickers (Supply, Demand, Broken): Customizes the visual profile of active order blocks. Mitigated or invalidated structural levels automatically transition to the designated Broken Zone Color (defaulting to a muted gray) to visually archive historic breaches.
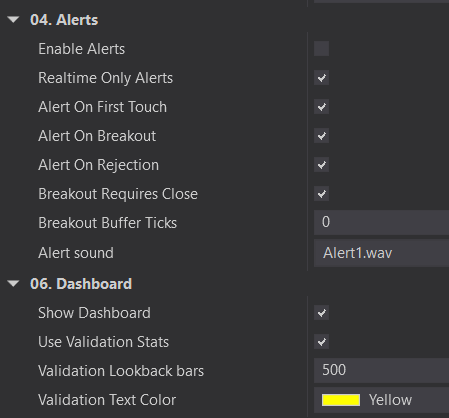
4. Advanced Alert Rules & Execution Filters
The alert suite provides granular control over trade notifications, filtering out false breakouts and allowing precision entries based on three unique phases of zone interaction.
-
Enable Alerts / Realtime Only Alerts: Global toggles that dictate whether notifications are active and restrict them exclusively to live, unfolding price action to eliminate historical repainting triggers.
-
Alert On First Touch: Triggers the exact moment price returns to mitigate a fresh structural zone for the very first time. Ideal for limit-order confirmation or immediate reversal plays.
-
Alert On Breakout: Triggers when a structural level fails completely, signaling an institutional order vacuum and a high probability of momentum continuation.
-
Alert On Rejection: Triggers when price sweeps into a zone but fails to break through, reversing back past the zone entry boundary. This alerts the trader to order absorption and potential defensive defended liquidity.
-
Breakout Requires Close: An execution filter determining structural invalidation rules. When enabled, a zone is only declared “Broken” if a candle closes completely outside its boundary, filtering out temporary wick-based stop-hunts.
-
Breakout Buffer Ticks: Adds a customizable padding distance (measured in minimum price ticks) beyond the zone edge. Price must breach the zone plus this buffer before alerts or structural status shifts occur, providing a margin of error against market noise.
5. Performance Dashboard & Validation Metrics
The diagnostic dashboard acts as a real-time backtesting module on the chart, monitoring institutional exit speeds and validating historical zone performance.
-
Show Dashboard: Toggles the real-time info panel on the workspace, providing metrics such as current distance to zones, departure velocity, and average historic expansion sizes.
-
Use Validation Stats: Toggles the historical verification engine, which tracks how effectively prior zones acted as structural barriers or led to confirmed structural breaches.
-
Broken Zone Lookback bars: Defines the precise historical data sample size (in bars) used to calculate the success rates shown on the dashboard.
Validation Text Color: Manages aesthetic formatting for dashboard metrics to ensure optimal contrast against chart backgrounds.
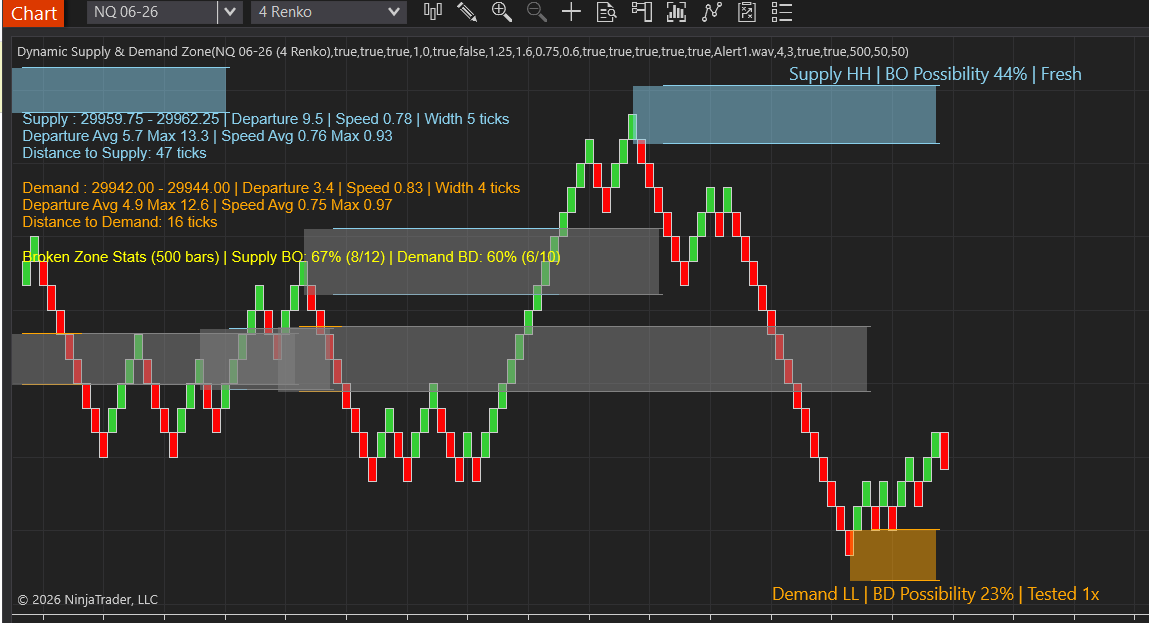
Please click this link to the following articles for a better understanding of how to use the Dynamic Supply Demand Zone indicator. These articles include case studies, guidance on adjusting input settings, explanations of the dashboard values, and other practical information to help you use the indicator more effectively.
Write a review
Your Name:Your Review: Note: HTML is not translated!
Rating: Bad Good
Enter the code in the box below:

Latest

Welcome to Patternsmart
Converting your indicator from one platform to another.Custom Alert, Autotrader, Indicators, Scan, Screener, Strategy and Signals.
Copyright @ 2026 Patternsmart - All rights reserved
This website is for educational and informational
purposes only and should not be considered a solicitation to buy or sell a
futures contract or make any other type of investment decision. It's not recommended to use any single indicator as sole evaluation criteria. The companies
and services listed on this website are not to be considered a recommendation
and it is the reader's responsibility to evaluate any product, service, or
company. patternsmart is not responsible for the accuracy or content of any
product, service or company linked to on this website.
Futures trading
contains substantial risk and is not for every investor.Please read the following risk disclosure before considering the
trading of this product:
Futures Risk Disclosure. An investor could
potentially lose all or more than the initial investment. Risk capital is money
that can be lost without jeopardizing ones financial security or life style.
Only risk capital should be used for trading and only those with sufficient risk
capital should consider trading. Past performance is not necessarily indicative
of future results.
Trading stocks, options, futures and forex involves
speculation, and the risk of loss can be substantial.Investor must consider all
relevant risk factors, including their own personal financial situation, before
trading. Trading foreign exchange on margin carries a high level of risk, as
well as its own unique risk factors. Forex investments are subject to
counter-party risk, as there is no central clearing organization for these
transactions. Please read the following risk disclosure before considering the
trading of this product:
Forex Risk Disclosure. Spreads, Straddles, and other multiple-leg option
strategies can entail substantial transaction costs, including multiple
commissions, which may impact any potential return. Options are not suitable for
all investors as the special risks inherent to options trading may expose
investors to potentially rapid and substantial losses. Prior to trading options,
you should carefully read
Characteristics and Risks of Standardized Options.
patternsmart.com
will not be held liable for the loss of money or any damage caused from relying
on the information on this site. Any investment decision you make in your account is solely your responsibility.
TESTIMONIAL DISCLOSURE: TESTIMONIALS APPEARING ON OUR SITE MAY NOT BE REPRESENTATIVE OF THE EXPERIENCE OF OTHER CLIENTS OR CUSTOMERS AND IS NOT A GUARANTEE OF FUTURE PERFORMANCE OR SUCCESS.